Introduction to Table of Contents in Word
A table of contents in Word plays a key role in keeping lengthy documents clear and easy to follow. Whether you’re preparing a formal report, an academic assignment, a training guide, or a detailed proposal, a well-organized table of contents helps readers find exactly what they need without wasting time. While many users know that Word can create a table of contents automatically, far fewer realize just how adaptable and efficient this feature can be when it’s used correctly.
This guide walks you through the essential table of contents features in Word, from inserting a table of contents to adding and managing entries the right way, as well as using ready-made templates to save time. Every section is written with clarity and practicality in mind, focusing on actionable steps and explanations you can use immediately in your own documents.
What Is a Table of Contents in Word?
In Word, a table of contents provides an organized overview of your document’s structure, typically placed at the beginning for easy reference. It lists each central section and subsection, along with the page where it appears, giving readers a clear overview before they begin. One of its biggest strengths is automation: when content is added, removed, or rearranged, the table can be updated in seconds, eliminating the need for manual edits and reducing the risk of errors.
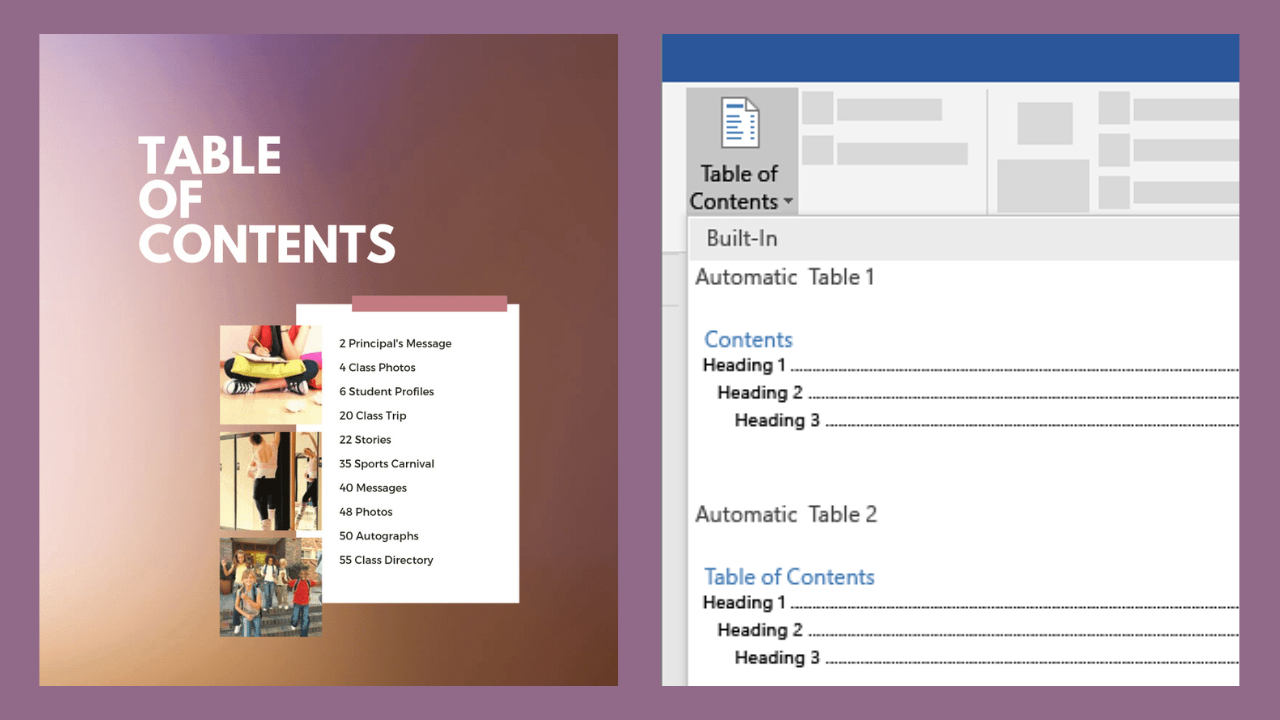
Word creates a table of contents by recognizing the heading styles used across your document. A Heading 1 is read as a primary section, Heading 2 as a sub-section, and Heading 3 as a further breakdown within that topic. By following this built-in hierarchy, Word can automatically generate a clear, well-structured overview of your content without manual formatting or frequent adjustments.
Why Using a Table of Contents in Word Is Important
Using the table of contents feature in Word immediately gives a document a more polished and reader-friendly feel. It lets readers see the content’s organization at a glance and move directly to the sections they’re interested in. This becomes especially valuable in longer documents, where manually scrolling through page after page would be time-consuming and frustrating.
From the writer’s perspective, a table of contents reduces much of the frustration associated with manual page numbering and frequent edits. Rather than updating the contents page after every minor change, Word handles updates for you. This keeps section titles and page numbers accurate throughout the writing process, from early drafts right through to the finished document.
Inserting a Table of Contents in Word
Adding a table of contents in Word is simple, but the results are far better when the document is set up correctly first. Before you insert the table, ensure all section titles are formatted using Word’s built-in heading styles, as this is what enables the table of contents to function correctly.
To insert a table of contents in Word:
Start by clicking where you want the table of contents to appear, typically just after the title page or opening section. Then head to the References tab in the Word toolbar, choose Table of Contents, and pick one of the automatic options. Word will immediately create the table based on the headings already used throughout your document.
The automatic option is usually the better choice because it adjusts as your document evolves. When sections move or page numbers change, the table can be refreshed in seconds. Manual tables, on the other hand, must be edited manually whenever anything changes, making them practical only for very short documents with a fixed structure.
How to Add Headings Correctly for the Table of Contents in Word
The table of contents feature in Word depends entirely on proper heading styles. Making text larger or bold might look like a heading, but Word doesn’t recognize it as one. To have sections appear correctly in the table of contents, apply the built-in heading styles on the Home tab.
Use Heading 1 for your main sections, Heading 2 for supporting sections, and Heading 3 for more detailed breakdowns within those topics. This layered structure tells Word how to organize the table of contents. When these styles are applied consistently from start to finish, the result is a clear, well-organized contents page that’s easy to read and navigate.
You can adjust heading styles to better fit your layout or visual preferences without reformatting each section individually. When you change a heading style, Word applies the update everywhere the style is used, keeping your document’s look consistent and saving time as your content grows.
How to Add or Update the Table of Contents in Word
After adding a table of contents, it doesn’t automatically reflect all changes you make to the document. If sections are moved, new content is added, or pages shift, the table must be updated manually to remain accurate.
To refresh the table of contents in Word, click anywhere in the table of contents to open the update options. You’ll then be asked whether you want to adjust just the page numbers or refresh the entire table. Choosing the full update is usually the best option, as it captures any new headings or title changes and keeps everything properly aligned.
Making a habit of updating the table of contents is a smart step, particularly before you print the document or send it to others. It helps ensure that page numbers and section titles are accurate, so the final version looks polished and dependable.
Understanding the Table of Contents Word Template
A table-of-contents Word template is a ready-made document that includes an organized table of contents and example headings. It’s beneficial for people who regularly work on similar papers or need to maintain the same layout and formatting across multiple files without starting from scratch each time.
Using a template helps streamline the process and minimize mistakes during setup. Rather than building the layout from the ground up, you can replace the placeholder text with your own content and refresh the table of contents. This approach is especially valuable in professional settings where consistent branding, formatting, and document structure really matter.
You can also build your own Word table of contents template by saving a document that already includes your preferred heading styles and a custom table of contents. This makes it easy to reuse the same structure for future projects without rebuilding everything.
How to Customize the Table of Contents in Word
Word gives you a lot of flexibility when it comes to customizing the table of contents. You can decide how many heading levels are shown, tweak fonts and spacing, and adjust alignment or leader styles to match your layout. These options make it easy to tailor the table to the tone and purpose of different types of documents.
Customization also lets you decide whether page numbers are displayed, align them neatly to the right, and choose how entries are visually separated. In more complex documents, limiting the number of heading levels in the table can make it easier to read and prevent the contents page from feeling cluttered.
Careful customization helps make the table of contents quick to scan and visually consistent with the rest of the document, so it feels like a natural part of the layout rather than an afterthought.
Common Problems with the Table of Contents in Word
A common frustration is encountering sections that don’t appear in the table of contents. This almost always occurs when headings are formatted manually rather than using Word’s built-in styles. Applying the correct heading styles consistently fixes the issue and ensures all sections are included.
Another common issue is page numbers that don’t align with the content. This usually occurs when the table of contents hasn’t been updated after changes were made. A quick refresh of the table corrects the numbers and brings everything back in sync.
At times, the table of contents can feel cluttered because it shows too many levels or sections that aren’t necessary. Reducing the number of heading levels displayed helps simplify the layout and keeps the table clear and easy to read.
Best Practices for Table of Contents Word
For the best results, it helps to think about your document’s structure before you start writing. Applying heading styles as you work, rather than formatting text by hand, makes creating and maintaining the table of contents much smoother later.
When you’re creating the same types of documents repeatedly, templates can save significant time and effort. It’s also essential to update the table of contents regularly and give it one final refresh before sharing or printing the document, so everything is accurate and up to date.
Following these habits helps keep your table of contents accurate, polished, and simple to manage, giving your document a consistently professional finish without unnecessary effort.
Conclusion: Using the Table of Contents Word Effectively
Knowing how to insert a table of contents in Word properly, add entries correctly, and work with a table of contents template can make a noticeable difference in the overall quality of your documents. By relying on Word’s built-in tools instead of manual formatting, you get a cleaner structure, fewer errors, and a more refined final result with far less effort.
When you apply heading styles consistently, fine-tune the table to suit your layout, and keep it updated as the document evolves, you end up with work that’s clear, easy to navigate, and visually polished. Learning to use Word’s table of contents effectively not only saves time but also elevates the overall quality and professionalism of your documents.
Read More: NewsDetects.
Add a Comment